Grouting A Washer Base
When a hard mount washer is installed the steel base is bolted to the concrete, hence the name hard mount. Soft mount washers are not bolted down. The reason is that a soft mount washer inside tub is suspended by a set of springs/shock absorbers. Residential washers are made this way and commercial washers are available from some manufacturers in many sizes including 60# and up.
Hard mount washers need to be bolted down to a solid concrete base to prevent them from literally moving around during the cycle.
In many cases, a separate steel base is purchased to be installed under the washer. This is typically made from 4″ to 12″ C-Channel and welded together.

In other cases, a concrete plinth is pored and the washer is bolted directly to it. These are typically finished on the front with tile to give a nice, easy to clean look.
For the washer to work correctly, and for the long term, it needs to be level and secure. They do have a vibration sensor switch that would be triggered if the bolts came loose or some other major failure occurred.
The steel base needs to be built square from the start for things to work best.
Once the concrete is cured, if a new floor was installed, the steel base is positioned and holes are drilled in 4 to 10 locations, and possibly more for very large machines.
The base is leveled with washers or steel shims and concrete anchors of 1/2″ and larger are used to secure the base to the concrete.
In very few cases the concrete is flat and level enough that there are no gaps under the base but normally there are some spaces.
To provide the best steel/concrete connection possible and prevent any vibration due to the steel flexing over time a grout is installed between the steel base and the floor. This grout is sometimes referred to as Precision or Machine Grout. It is a non-shrink material so once it fills a gap it hardens and stays the same size.

Now there is some discussion about whether grout is needed if the floor is ” really flat” and other discussions about how thick the grout should be.
I have seen installations where the washer base is 3/4″ above the concrete and the grout is molded into place as it sets and fills the space all the way around. This does require more skill and longer time as each one has to be monitored as it sets up.
My experience is that I want to fill every gap I can stuff it into and not have to worry about it again. The extra couple of hours and $50 in grout is worth not having a machine fail prematurely due to vibrations. Or worse to have the bolts pull loose from the floor and you have to remove the washer, drill new holes in the base and concrete and start over.
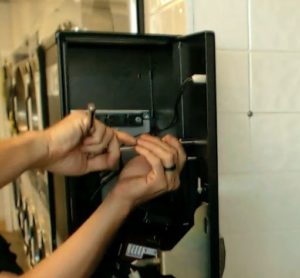
The washer in the pictures needed a bearing change and I have previously noticed there was almost no grout in the base so it seemed like a good time to tighten everything up.
The grout does need about 24 hours to set so the machine needs to be off. This time will vary depending on temperature, water content, thickness and other factors.
As the washer was on the base I needed to be able to pour the grout in. I used the lid of a garbage can with a hole cut in it to act as a funnel. I also mixed the grout a little runny so it would flow in.

Once it was poured in I set to work pushing it into the gap between the floor and base. You can see this in the video.
Any extra that gets on the outside can be pushed back into the gap or trimmed away as it sets. The residue can be cleaned with a damp cloth before it completely dries.
A small trowel is used to push the grout into the gaps.
Installation in bases before the washers are set will normally use less grout as it’s easier to work it into the gaps and maintain the excess near the edges of the steel base. Pouring it into a base with the machine on top was easier with the runny mixture and less than one bag was used so excess in the base was not a concern.

You will see a slight color change as the grout sets up and hardens and by the next day it should be set. As mentioned before there are some variables so don’t rush it. If you can leave it an extra day before running the machine or even installing the machines there is less chance of it being cracked or weakened.

A smooth service is nice if you need to clean the area in the future but don’t expect it.
That’s the basics of grouting a washer base.
Ken

Multi-Store Laundromat Owner, Business Coach, Author and Speaker.